Drawing a diskette, also known as a floppy disk, can be a fun and educational activity, especially for those interested in retro technology or digital art. While diskettes are no longer commonly used, they remain a symbol of the early computer era and are still recognized as the universal icon for saving files. If you want to learn how to draw a diskette, whether for design, illustration, or nostalgia, it’s useful to break down the shape and details into simple steps. This guide will help you understand the structure of a floppy disk and how to recreate it accurately and creatively.
Understanding the Basic Structure of a Diskette
What Is a Diskette?
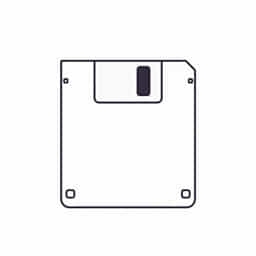
A diskette is a square-shaped data storage device that was widely used during the 1980s and 1990s. It typically measures 3.5 inches on each side. The diskette contains a circular magnetic disk inside that stores data, protected by a plastic casing. The most recognizable version is the 3.5-inch floppy disk, which has a rigid shell with a metal shutter that protects the internal disk.
Key Components to Draw
Before you begin sketching, it helps to know the parts you’ll need to include:
- The square outer casing
- The circular hub in the center (visible through a small cut-out)
- The rectangular metal shutter at the top
- A label area, often rectangular and off-center
- Details like grooves, screws, or holes on the corners
Tools and Materials Needed
Drawing by Hand
- Pencil and eraser for initial sketches
- Ruler for straight edges and proportions
- Black pen or fine liner for outlining
- Colored pencils or markers for shading and coloring
Digital Drawing
- Drawing tablet or stylus
- Digital drawing software (such as Procreate, Adobe Illustrator, or Krita)
- Grid or guide tools for symmetry
Step-by-Step Guide on How to Draw a Diskette
Step 1: Draw the Outer Shape
Start by drawing a perfect square to represent the diskette’s body. You can use a ruler or grid to keep the proportions even. A typical ratio would be 1: 1, so if one side is 10 cm, all sides should match. Make sure the edges are clean and sharp.
Step 2: Add the Metal Shutter
At the top of the square, draw a slightly smaller rectangle that stretches across the width of the disk. This rectangle represents the metal shutter. Inside it, sketch a small square or oval opening in the center this is where the magnetic head would access the disk’s surface.
Step 3: Draw the Central Hub Area
Below the metal shutter, slightly off-center, draw a circular area to represent the inner disk hub. This circle should be small, roughly one-third the width of the entire diskette. If you’re going for accuracy, you can include the notched pattern commonly seen on real diskettes.
Step 4: Add the Label Area
On the upper portion of the diskette, draw a rectangle off to one side to represent the label area. This is where people would write the contents or use stickers. You can add thin horizontal lines inside the rectangle to simulate handwritten text lines.
Step 5: Include Corner Details
In the bottom corners of the diskette, draw small circular notches or screw heads. These are often included in the plastic casing of real floppy disks. On the lower left or right, you can also include the write-protection notch a small rectangle that adds authenticity to your drawing.
Step 6: Add Depth and Detail
Use shading to create a sense of depth. Darken the edges, shadow the inside of the shutter opening, and add light gradient to the label area. If you’re coloring, the main body is typically gray or black, while the metal shutter is silver. Labels can be white or any bright color.
Tips for Drawing a Realistic Diskette
Use Reference Images
Looking at photos of actual floppy disks can help you get the proportions and details right. Focus on the perspective, label layout, and any subtle texture patterns.
Keep Lines Clean
Especially for digital drawings, keep your linework precise and clean. Use vector tools if possible to maintain smooth edges and even symmetry. For hand drawings, go over your final lines with ink after erasing the pencil sketch.
Play with Perspective
For a more dynamic look, try drawing the diskette in perspective rather than flat. A slight angle can make the object look more three-dimensional. Use vanishing points and guide lines to help you maintain the correct proportions.
Experiment with Styles
You can keep your diskette drawing technical and accurate, or you can experiment with cartoon styles, add faces or personalities to the disk, or integrate it into a retro-inspired design. Drawing a diskette doesn’t have to be purely technical it can be creative, too.
Why Drawing a Diskette Is Still Relevant
Learning Retro Technology
Drawing old tech like diskettes can be a fun way to connect with computing history. It gives insight into how digital storage has evolved over time and reminds us of where modern data storage originated.
Useful for Design Projects
Many graphic designers and illustrators include retro elements in their work. A well-drawn floppy disk can be a great addition to logos, posters, or nostalgic illustrations. It’s a recognizable icon that evokes memories and tells a story.
Practicing Proportional Drawing
Because the shape of a diskette involves straight lines, circles, and balanced proportions, it’s a great object for beginners to practice technical drawing skills. It teaches how to keep lines straight, work with symmetry, and apply consistent shading.
Common Mistakes to Avoid
- Wrong Proportions: Make sure the shutter and hub aren’t too large or too small. Always sketch lightly first so adjustments can be made.
- Overcomplicating Details: Focus on the essential features. Extra screws, logos, or vents can be added later if necessary.
- Ignoring Perspective: If attempting a 3D view, be consistent with angles and dimensions. Misaligned lines can distort the shape.
Final Touches
Once your basic diskette drawing is complete, you can add personalized details like handwritten labels, company logos, or artistic textures. Use soft shading or cross-hatching to make it more dimensional. For digital art, consider using layer effects to simulate metallic surfaces or worn textures.
Drawing a diskette is a simple yet rewarding project that blends historical appreciation with artistic technique. By understanding the structure and following a step-by-step approach, anyone can create a clear and accurate illustration of this classic storage device. Whether you’re sketching by hand or creating a digital artwork, the key is to focus on proportion, essential features, and creative expression. Over time, you’ll not only get better at drawing diskettes, but also develop a deeper appreciation for retro tech icons that shaped the digital world we live in today.